The tutorial is only a stepping stone to a more feature rich site for your writers and users. Discover how to add extra user fields and how to manipulate them on your site.
Step 1 Creating Settings Page
For this tutorial I am utilising the default theme Twenty Eleven. You can use your current theme and tweak where necessary.As the first step, we would like to create a page to accept the default Publisher ID. I was fortunate to come across this great and simple tutorial ”
Quick Tip: Create A WordPress Global Options Page“. It’s a good read and I will adopt some methods into this tutorial.
First locate the functions.php file in your currently activated theme. Then at the bottom add the following code snippet. The snippet will register a new Admin Menu, it will call the function
adshare_menu.- // Create Custom Settings Menu
- add_action('admin_menu', 'adshare_menu');
add_submenupage function. The first parameter will determine the parent menu for the Settings Page.“Here are some other other Parent Menu to choose from”
Submenu Pages
- function adshare_menu() {
- //Create Sub-Level Menu Page under Settings
- add_submenu_page( 'options-general.php', 'Ad Share Settings', 'Ad Share', 'manage_options', 'adshare_settings_page', 'adshare_settings_page');
- }
Creating the Setting Page Display
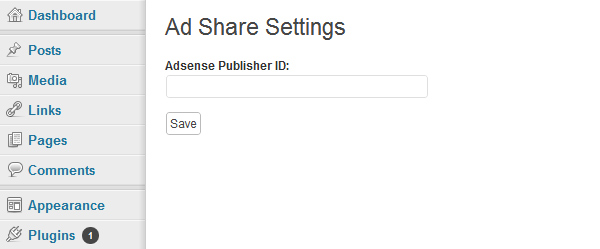
Now we will design the layout for the settings page. Note that the function is calledadshare_settings_page, just like the last the parameter in our previous code.- function adshare_settings_page() {
- // Must check that the user has the required capability
- if (!current_user_can('manage_options'))
- {
- wp_die( __('You do not have sufficient permissions to access this page.') );
- }
- ?>
- <div class="wrap">
- <h2>Ad Share Settings</h2>
- <form method="post" action="options.php">
- <?php wp_nonce_field('update-options') ?>
- <p><strong>Adsense Publisher ID:</strong><br />
- <input type="text" name="publisher-id" size="45" value="<?php echo get_option('publisher-id'); ?>" />
- </p>
- <p><input type="submit" name="Submit" value="Save" /></p>
- <input type="hidden" name="action" value="update" />
- <input type="hidden" name="page_options" value="publisher-id" />
- </form>
- </div>
- <?php
- }

Step 2 Creating an Extra User Field
Our next step is to create the option for users to save their ownPublisher ID
Adding Profile Actions
To add the ability for both admin and users to update a user profile field, we need to call two WP Action Hooks. The hooks areedit_user_profile and show_user_profile. Add the this snippet to your file.- add_action( 'show_user_profile', 'adshare_profile_fields' );
- add_action( 'edit_user_profile', 'adshare_profile_fields' );
Adding the Form Field
Now that you’ve added those hooks, let’s call the function in the second parameteradshare_profile_field.
This function holds the form fields that will be displayed in a user’s
edit form. You can tweak the HTML any way that you like, but be sure to
maintain the correct name and value attributes for this tutorial.- function adshare_profile_fields( $user ) { ?>
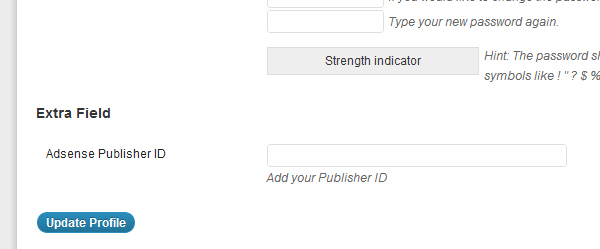
- <h3>Extra Field</h3>
- <table class="form-table">
- <tr>
- <th><label for="twitter">Adsense Publisher ID</label></th>
- <td>
- <input type="text" name="publisher-id" id="publisher-id" value="<?php echo esc_attr( get_the_author_meta( 'publisher-id', $user->ID ) ); ?>" class="regular-text" /><br />
- <span class="description">Add your Publisher ID</span>
- </td>
- </tr>
- </table>
- <?php }
Saving Profile Field
So far, we’ve added the form fields but that does not save them. In order to update a user profile, we need two action hooks;personal_options_update & edit_user_profile_update. Add the following hooks.- add_action( 'personal_options_update', 'adshare_save_profile_fields' );
- add_action( 'edit_user_profile_update', 'adshare_save_profile_fields' );
adshare_save_profile_fields function. This function will take the POST data and save it to the user meta information. Just like when a user updates their name, our new field will be added.- function adshare_save_profile_fields( $user_id ) {
- if ( !current_user_can( 'edit_user', $user_id ) ){
- return false;
- }
- update_usermeta( $user_id, 'publisher-id', $_POST['publisher-id'] );
- }
Step 3 Adding Adsense to Post
If you’ve made it this far, I am happy for you. We have one last function to create in our functions.php file. Let’s create the function that will choose the publisher ID and display it in the Google Ad on the site- function adsense_ad() {
- if(get_the_author_meta( 'publisher-id' )){
- $input = array(get_option('publisher-id'), get_the_author_meta( 'publisher-id' ));
- }else{
- $input = array(get_option('publisher-id'));
- }
- shuffle($input);
- ?>
- <script type="text/javascript"><!--
- google_ad_client = "ca-<?php echo $input[0]; ?>";
- google_ad_width = 468;
- google_ad_height = 60;
- //-->
- </script>
- <script type="text/javascript" src="http://pagead2.googlesyndication.com/pagead/show_ads.js"></script>
- <?php
- }
- if(get_the_author_meta( 'publisher-id' )){
- $input = array(get_option('publisher-id'), get_the_author_meta( 'publisher-id' ));
- }else{
- $input = array(get_option('publisher-id'));
- }
shuffle, as simple as it is, shuffles the
values of the array. This is important to get the Publisher ID to change
when a page is visited or refreshed.- shuffle($input);
$input[0], which will show the first value of the shuffled array. Simple but effective.- <script type="text/javascript"><!--
- google_ad_client = "ca-<?php echo $input[0]; ?>";
- google_ad_width = 468;
- google_ad_height = 60;
- //-->
- </script>
- <script type="text/javascript" src="http://pagead2.googlesyndication.com/pagead/show_ads.js"></script>
Call Function on Page
Finally, we can call the functionadsense_ad() in our single.php file. For this tutorial, I called the function between the post and the comments.- <?php get_template_part( 'content', 'single' ); ?>
- <?php adsense_ad(); ?> //Call Adsense Function
- <?php comments_template( '', true ); ?>
Total Code
Here’s the entire chunk of code from our tutorial. Hope you find it useful.- // Create Custom Settings Menu
- add_action('admin_menu', 'adshare_menu');
- function adshare_menu() {
- //Create Sub-Level Menu Page under Settings
- add_submenu_page( 'options-general.php', 'Ad Share Settings', 'Ad Share', 'manage_options', 'adshare_settings_page', 'adshare_settings_page');
- }
- function adshare_settings_page() {
- //must check that the user has the required capability
- if (!current_user_can('manage_options'))
- {
- wp_die( __('You do not have sufficient permissions to access this page.') );
- }
- ?>
- <div class="wrap">
- <h2>Ad Share Settings</h2>
- <form method="post" action="options.php">
- <?php wp_nonce_field('update-options') ?>
- <p><strong>Adsense Publisher ID:</strong><br />
- <input type="text" name="publisher-id" size="45" value="<?php echo get_option('publisher-id'); ?>" />
- </p>
- <p><input type="submit" name="Submit" value="Save" /></p>
- <input type="hidden" name="action" value="update" />
- <input type="hidden" name="page_options" value="publisher-id" />
- </form>
- </div>
- <?php
- }
- add_action( 'show_user_profile', 'adshare_profile_fields' );
- add_action( 'edit_user_profile', 'adshare_profile_fields' );
- function adshare_profile_fields( $user ) { ?>
- <h3>Extra Field</h3>
- <table class="form-table">
- <tr>
- <th><label for="twitter">Adsense Publisher ID</label></th>
- <td>
- <input type="text" name="publisher-id" id="publisher-id" value="<?php echo esc_attr( get_the_author_meta( 'publisher-id', $user->ID ) ); ?>" class="regular-text" /><br />
- <span class="description">Add your Publisher ID</span>
- </td>
- </tr>
- </table>
- <?php }
- add_action( 'personal_options_update', 'adshare_save_profile_fields' );
- add_action( 'edit_user_profile_update', 'adshare_save_profile_fields' );
- function adshare_save_profile_fields( $user_id ) {
- if ( !current_user_can( 'edit_user', $user_id ) ){
- return false;
- }
- update_usermeta( $user_id, 'publisher-id', $_POST['publisher-id'] ); //
- }
- function adsense_ad() {
- if(get_the_author_meta( 'publisher-id' )){
- $input = array(get_option('publisher-id'), get_the_author_meta( 'publisher-id' ));
- }else{
- $input = array(get_option('publisher-id'));
- }
- shuffle($input);
- ?>
- <script type="text/javascript">
- <!--
- google_ad_client = "ca-<?php echo $input[0]; ?>";
- google_ad_width = 468;
- google_ad_height = 60;
- //-->
- </script>
- <script type="text/javascript" src="http://pagead2.googlesyndication.com/pagead/show_ads.js"></script>
- <?php
- }
Conclusion
Now you know how to add some extra fields to your user profile and can attract some new writers to your blog. The rest of this tutorial is left to your imagination. You can use these methods to share Facebook Likeboxes or other Ad publishing blocks. Happy Coding!Article by: Kailan Wyatt